
Introduction:
This is Method 4 in our troubleshooting series for Samsung Side-by-Side refrigerator ice maker problems. If your ice maker isn’t producing ice, but it’s not frozen up (as addressed in Method 1), a valuable diagnostic step is to manually initiate its test cycle. This can help determine if the ice maker’s mechanics are functioning correctly, if it’s receiving water, or if there is an issue with its internal sensors or motor.
Activating the test cycle essentially forces the ice maker through its harvesting and filling process, allowing you to observe its operation.
Disclaimer: This guide is for informational purposes. You will interact with the ice maker mechanism while the refrigerator is powered on (for this specific test). Exercise caution and keep fingers clear of moving parts. If you are uncomfortable with any step or if your ice maker looks significantly different, consult a qualified appliance repair technician. Other disassembly steps mentioned for access should still be done with the refrigerator unplugged. We are not liable for any damage or injury.
When to Use the Ice Maker Test Cycle:
- The ice maker is not producing any ice or has stopped producing ice.
- There is no apparent major ice blockage in the fill tube tip (Method 1) or in the ice dispenser chute (Method 3).
- You want to check if the ice maker is receiving water.
- You want to check if the mechanical parts of the ice maker (ejector arms, mold heater) are functioning correctly.
- As a way to reset the ice maker if it appears to be stuck in an unknown state.
Tools & Materials You’ll Need:
- Towels (in case of minor water spillage during testing).
- Your refrigerator’s user manual may indicate the location of the test button.
Step-by-Step Guide to Testing and Resetting the Ice Maker Cycle:
Step 1: Ensure Pre-conditions are Met
- Power ON: For this specific test, the refrigerator must be plugged in and powered on.
- Ice Maker ON: Ensure the ice maker function is enabled on your refrigerator’s control panel (the “Ice Off” light should not be illuminated).
- Water Supply ON: Ensure the water supply valve to the fridge is open.
- Freezer Temperature: The freezer should be at its normal operating temperature (around 0°F / -18°C or below) for the ice maker to typically cycle. If it’s too warm, it might not initiate a fill even during a test.
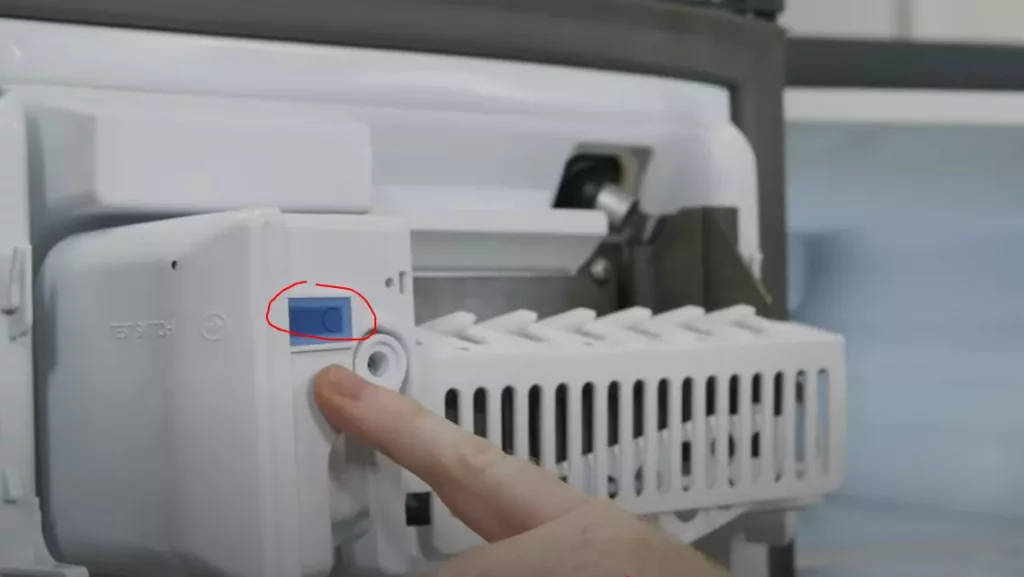
Step 2: Locate the Ice Maker Test Button/Switch
- Open the freezer door.
- Remove the ice bucket to get a clear view of the ice maker assembly.
- The test button or switch is typically a small, often recessed button or a marked switch located on the side or bottom of the plastic ice maker control housing or motor module.
- It might be labeled “TEST,” “RESET,” or have a small gear icon.
- Sometimes, it’s a small pinhole that requires a non-metallic tool, such as a toothpick, to press.
- Refer to online videos or parts diagrams for your specific Samsung Side-by-Side model if you have trouble locating it. Search “Samsung [your model] ice maker test button.”
Step 3: Initiate the Test Cycle
- Once you’ve located the test button/switch:
- Button: Press and hold the button firmly for about 3-5 seconds, then release.
- Switch: If it’s a switch, toggle it to the “TEST” or “ON” position (if it’s a momentary switch, it will return to its original position).
- You should hear a click or the ice maker motor starting to whir, indicating the test cycle has begun. Keep your fingers clear of all moving parts.
Step 4: Observe the Test Cycle – What to Look For:
The ice maker will attempt to go through its complete harvest and fill sequence:
- Mold Heater Activation (Internal): You won’t see this, but an internal heater in the mold should activate to slightly warm the mold, loosening any ice cubes.
- Ejector Arm Rotation: The ejector arms (rakes or fingers) will slowly rotate to push any ice cubes (if present from a previous cycle) out of the mold and into the area where the ice bucket would typically be.
- Observation: Do the arms move smoothly, or do they struggle, make grinding noises, or get stuck?
- Water Fill: After the ejector arms complete their sweep and return to their home position, the water inlet valve should open, and water should flow through the fill tube to fill the ice maker mold.
- Observation: Does water enter the mold? Is the stream steady and directed correctly, or weak/sporadic/spraying?
- Cycle Completion: The ice maker will then sit idle, waiting for the water to freeze for the next harvest cycle.
Step 5: Interpret the Results
- Scenario A: Cycle Completes Normally & Fills with Water:
- This is good! It means the ice maker mechanics, motor, and water fill system (at least for one cycle) are likely working.
- The issue might have been a temporary glitch, a problem with the ice level sensor (if it was falsely sensing a full bin), or perhaps the freezer wasn’t cold enough previously.
- Action: Reinstall the ice bucket, ensure the ice level arm/sensor is functioning, and monitor for new ice production over the next 12-24 hours.
- Scenario B: Cycle Occurs, Ejector Arms Move, BUT NO Water Fills the Mold:
- This strongly indicates a water supply problem. Possible causes:
- The main water supply valve to the fridge is closed or partially closed.
- The water filter is severely clogged.
- The fill tube is completely frozen solid (refer back to Method 1).
- The water inlet valve is faulty and not opening due to either electrical or mechanical failure of the valve.
- (Rarely) Issue with the control board not sending the signal to the water valve.
- Action: Re-check water supply, filter, and fill tube for apparent blockages. If those are clear, the water inlet valve is the next suspect (see Method 2).
- This strongly indicates a water supply problem. Possible causes:
- Scenario C: Ice Maker Makes No Sound or Movement, or Only Clicks/Struggles:
- This indicates a problem with the ice maker unit itself or its power supply. Possible causes:
- Faulty ice maker motor.
- The fault is with the faulty internal components or the thermostat within the ice maker.
- Loose or damaged wiring connection to the ice maker.
- (Less likely if other freezer functions work) A problem with the main control board is that it is not supplying power to the ice maker.
- Action: Double-check the ice maker’s wiring harness connection. If it’s secure, the ice maker assembly itself is likely faulty and may need replacement. Refer to the methods for replacing the whole assembly, similar to “Method 10” in our French Door series, but using the correct part for your Side-by-Side.
- This indicates a problem with the ice maker unit itself or its power supply. Possible causes:
- Scenario D: Water Overfills the Mold During the Test Cycle:
- This typically indicates a faulty water inlet valve that fails to shut off correctly after the fill, or a problem with the ice maker’s internal water level control (a less common issue).
- Action: The water inlet valve is the primary suspect for replacement.
Important Considerations:
- One Cycle Only: The test button typically initiates only one complete harvest and fill cycle.
- Freezer Temperature: The test might not result in a water fill if the freezer is too warm, as the ice maker’s thermostat might prevent it. Ensure the freezer is at its normal cold temperature.
Conclusion:
Using the ice maker’s test button is an invaluable diagnostic tool for Samsung Side-by-Side refrigerators when ice production stops without any apparent cause, such as freezing. It helps narrow down whether the issue lies with the ice maker’s mechanics, its water supply, or its internal controls. Based on the test results, you can proceed to more specific troubleshooting steps or component replacements.
Next, suppose a faulty water inlet valve is suspected of causing no fill (rather than a leak causing freezing, as in Method 2). In that case, we’ll revisit aspects of its diagnosis, though the core issue becomes “no water” rather than “too much water causing freezing” (Or we can move to another distinct method for Side-by-Sides).