
Introduction:
Welcome to our troubleshooting series for Samsung Side-by-Side refrigerator ice maker issues! If your ice maker has stopped producing ice, or if you see ice building up around the water inlet area of the ice maker in your freezer compartment, a common culprit is a frozen fill tube tip. This article, Method 1, will guide you through how to thaw and clear this blockage safely.
Unlike some French Door models, where the entire ice maker compartment might freeze due to air leaks, Side-by-Side ice makers are located directly in the freezer. This makes the tip of the water fill tube susceptible to freezing if there’s even a tiny water drip or residual water after a fill cycle.
Disclaimer: This guide is for informational purposes. You will work near the ice maker and potentially use a heat source. Always unplug your refrigerator from the power outlet before attempting repair or direct thawing. If you are uncomfortable with these steps, please consult a qualified appliance repair technician. We are not liable for any damage or injury.
When to Suspect a Frozen Fill Tube Tip:
- The ice maker has stopped producing ice altogether.
- You can see a visible ice blockage at the very end of the small tube that delivers water into the ice maker mold.
- You might see ice buildup extending from the fill tube tip into the ice mold or onto surrounding components.
- The ice maker attempts to cycle (you might hear it try), but no water enters the mold.
Why Does the Fill Tube Tip Freeze?
The fill tube delivers water to the ice maker mold. Because its tip is constantly exposed to the sub-zero temperatures of the freezer:
- Tiny Drips: If the water inlet valve doesn’t shut off 100% perfectly, a very slow, almost imperceptible drip can freeze as it exits the tube, gradually forming an ice plug.
- Residual Water: Sometimes, a small amount of water remains in the tube tip after a fill cycle and freezes before the next cycle.
- Freezer Temperature Too Low: Excessively low freezer temperatures can accelerate the freezing process of these small amounts of water.
Step-by-Step Guide to Thawing and Clearing the Fill Tube Tip:
Step 1: SAFETY FIRST – UNPLUG THE REFRIGERATOR!
- Disconnect your refrigerator from the electrical outlet. This is essential to prevent any electrical hazard while working, especially if you are using moisture.
Step 2: Locate the Fill Tube and Assess the Ice
- Open the freezer door.
- Remove the ice bucket to get a clear view of the ice maker assembly.
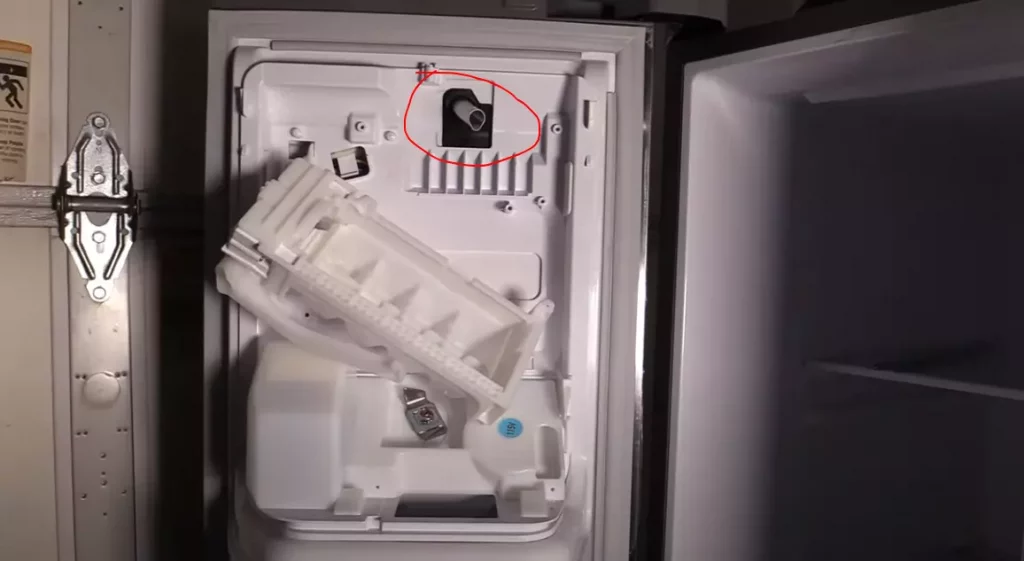
- Using your flashlight, identify the fill tube. It’s typically a small (often white or translucent) plastic or rubber tube that enters the ice maker assembly from the back or top of the freezer wall and is aimed towards the ice maker mold.
- Confirm that there is visible ice blocking the tip of this tube.
Step 3: Gently Thaw the Fill Tube Tip
- Using a Hair Dryer (Recommended Method):
- Set your hair dryer to its LOWEST or COOL heat setting. NEVER use high heat. High heat can melt or warp the plastic fill tube or refrigerator components.
- Direct the gentle airflow towards the frozen tip of the fill tube from a safe distance (e.g., 6-8 inches away).
- Keep the hairdryer moving; do not concentrate the heat on one spot for too long.
- This may take several minutes. Be patient.
- Have towels ready to absorb any dripping water as the ice melts.
- Using Warm Water (Alternative – Use with Extreme Caution if power is confirmed off):
- This method carries more risk if not done carefully. Ensure the refrigerator is UNPLUGGED.
- You can use a turkey baster or syringe to directly direct a tiny stream of warm (not hot) water onto the frozen tip.
- Be extremely careful not to get water on any electrical components of the ice maker or freezer. Have plenty of towels ready.
- This can be quicker but requires more care.
Step 4: Gently Clear any Remaining Slush (If Necessary and Safe)
- Once the ice plug has visibly melted or significantly loosened, if there is any remaining slush inside the tube opening, you can gently try to clear it with a soft, flexible implement, such as a plastic coffee stirrer.
- DO NOT FORCE ANYTHING INTO THE TUBE. The goal is only to help remove loose slush, not to poke or scrape hard ice, which could damage the tube.
Step 5: Dry the Area Thoroughly
- Use clean, dry towels or paper towels to remove all moisture from the fill tube, the ice maker mold, and the surrounding area. The area must be dry to prevent immediate refreezing.
Step 6: Restore Power and Monitor
- Plug the refrigerator back into the power outlet.
- Ensure the ice maker is turned ON at the control panel.
- Listen for the ice maker to cycle. It may take one or two cycles for it to attempt a fill.
- Observe if water now successfully fills the ice maker mold.
- Allow several hours for new ice to be produced.
Important Considerations & Next Steps if it Re-Freezes:
- Temporary Fix: Thawing a frozen fill tube tip often provides only temporary relief if the underlying cause isn’t addressed.
- Suspect Water Inlet Valve: If the fill tube tip freezes up again relatively quickly (e.g., within a day or two), it strongly suggests that the water inlet valve is faulty and allowing a tiny, persistent leak. This is the most common root cause. Fix Method 2: Diagnosing and Addressing Water Inlet Valve Leaks will cover addressing the valve.
- Check Freezer Temperature: Ensure your freezer temperature isn’t set unnecessarily low (e.g., below 0°F / -18°C), as this can make the tip more prone to freezing minor amounts of residual water.
Conclusion:
A frozen fill tube tip is a common reason why a Samsung Side-by-Side ice maker stops producing ice. Gently thawing this ice plug can often restore operation, at least temporarily. If the problem recurs frequently, further investigation into the water inlet valve is usually necessary.
Next up in our series for Side-by-Side refrigerators will be Fix Method 2: Diagnosing and Addressing Water Inlet Valve Leaks, often the root cause of a repeatedly freezing fill tube.