
Introduction:
This is Method 2 in our troubleshooting series for Samsung Side-by-Side refrigerator ice maker freezing issues. If you’ve successfully thawed a frozen fill tube tip (as detailed in Method 1) only to have it freeze up again quickly, a faulty or leaking water inlet valve is a very common culprit.
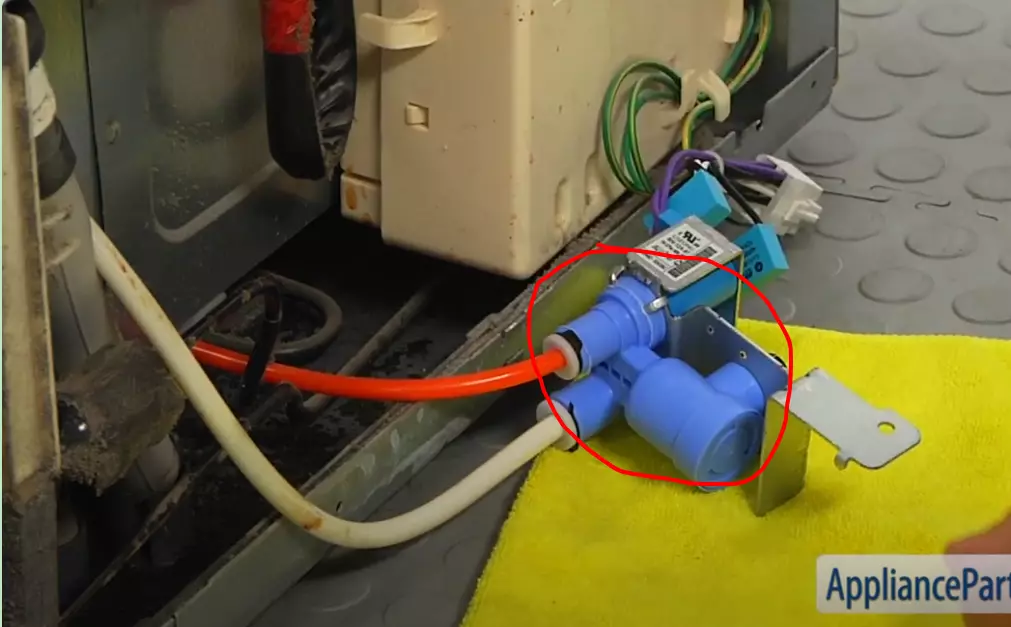
The water inlet valve is an electrically controlled valve, typically located at the back of your refrigerator, that opens to allow water to flow to the ice maker (and often the water dispenser). If this valve doesn’t seal shut entirely after a fill cycle, it can allow a slow, persistent water drip into the fill tube. This tiny amount of water freezes at the cold tip of the fill tube inside the freezer, eventually causing a blockage and stopping ice production.
Disclaimer: This guide is for informational purposes. Diagnosing and especially replacing a water inlet valve involves working with water lines and electrical components. Always unplug your refrigerator from the power outlet and turn off the main water supply to the fridge before attempting any disassembly, testing, or replacement. If you are uncomfortable with these steps, particularly the replacement, please consult a qualified appliance repair technician. We are not liable for any damage or injury.
When to Suspect a Leaking Water Inlet Valve:
- The ice maker’s fill tube tip repeatedly freezes over shortly after being thawed (a primary indicator).
- You observe a very slow, almost imperceptible drip from the fill tube into the ice maker mold between fill cycles (this can be hard to spot).
- If water continues to seep into the mold after the main fill, ice production will be inconsistent, or ice cubes will be unusually large or fused.
- You might (rarely) hear a very faint hissing or dripping sound from the back of the refrigerator where the valve is located.
Tools & Materials You’ll Need for Diagnosis (Replacement tools may vary):
- Flashlight.
- Towels or a shallow pan.
- Use a screwdriver (usually a Phillips or ¼” hex driver) to remove the refrigerator’s back access panel.
- Adjustable Wrench or Pliers: For disconnecting water lines, if you proceed with testing or replacement.
- Multimeter (Optional, for advanced electrical testing of the valve solenoids, usually done by technicians).
- If you need a Replacement Water Inlet Valve (if it’s been diagnosed as faulty), ensure it’s the correct part for your specific refrigerator model.
Step-by-Step Guide to Diagnosing a Leaking Water Inlet Valve:
Step 1: SAFETY FIRST – UNPLUG THE REFRIGERATOR & TURN OFF MAIN WATER SUPPLY!
- Disconnect your refrigerator from the electrical outlet.
- Completely shut off the main water supply valve that feeds your refrigerator.
Step 2: Access the Water Inlet Valve
- Carefully pull your refrigerator away from the wall to access its back panel. Be mindful of the flooring.
- Locate the water inlet valve. It’s usually a small, often blue or black, plastic or brass component where the main water supply line connects to the refrigerator. It will have one inlet and typically two outlets (one for the ice maker, one for the water dispenser if applicable), each controlled by an electrical solenoid.
- To fully expose the valve and its connections, you may need to remove a lower back access panel on the refrigerator (held by screws).
Step 3: Visual Inspection for Obvious Leaks (External)
- With a flashlight, carefully inspect the valve body and all its water line connections for any signs of external leaks, drips, or mineral buildup.
- If you see water actively leaking from the valve body itself or its connections, the valve is definitely faulty and needs replacement, or the connections need tightening (be gentle if tightening).
Step 4: The “Drip Test” at the Fill Tube (More Definitive for Internal Leaks)
* Preparation:
* Ensure the fill tube tip inside the freezer is completely thawed and clear (as per Method 1).
* Remove the ice bucket from the freezer.
* Place a dry towel or a shallow dish directly under the fill tube outlet inside the ice maker compartment to catch any drips.
* The Test:
1. Reconnect Refrigerator Power ONLY (Keep Main Water Supply OFF for now).
2. Turn ON the Main Water Supply to the Refrigerator.
3. Ensure the ice maker is turned ON at the control panel.
4. Do NOT activate the ice maker’s test cycle or dispense water. You are observing for passive drips between regular operation cycles.
5. Leave the refrigerator like this for anywhere from 30 minutes to a few hours.
6. Periodically check the towel/dish under the fill tube tip.
* Indication of a Leak: If you find water on the towel or in the dish, or if you see the fill tube tip beginning to ice over again during this observation period, it’s a strong indication that the water inlet valve is not closing completely and is allowing water to seep through.
Step 5: Further Diagnosis (If No Drip is Obvious but Suspicion Remains)
- If the drip test is inconclusive but you still suspect the valve due to rapid re-freezing of the fill tube, a technician might perform more advanced tests, such as:
- Disconnect the outlet line to the ice maker at the valve and observe if water seeps out of the outlet port when it should be closed.
- Testing the valve’s solenoids for correct electrical resistance with a multimeter (though a solenoid can test okay electrically, but still leak mechanically).
Step 6: Addressing a Leaking Valve – Replacement
- If the water inlet valve is diagnosed as leaking internally (causing the drip), the most reliable solution is to replace the entire assembly. Repairing internal valve seals is generally not feasible or cost-effective.
- Obtaining the Part: Order the correct replacement valve for your Samsung refrigerator model.
- Replacement Process (Simplified – Consult specific guides or a professional):
- Ensure power is OFF and water supply is OFF.
- Disconnect water lines from the old valve (have towels ready for residual water).
- Disconnect the electrical connectors from the old valve.
- Unmount the old valve.
- Mount the new valve.
- Reconnect electrical connectors.
- Reconnect water lines securely (use new compression ferrules if applicable, do not overtighten).
- Slowly turn the water supply back on and check thoroughly for leaks at all connections.
- Plug the refrigerator back in.
Important Considerations:
- Safety: Working with water and electricity requires extreme caution.
- Correct Part: Using the wrong replacement valve can lead to improper function or leaks.
- Professional Help Recommended for Replacement: While diagnosis can sometimes be DIY, replacing the valve can be tricky, and ensuring leak-free connections is critical. If unsure, hire a professional.
Conclusion:
A leaking water inlet valve is a prevalent hidden cause of a repeatedly freezing fill tube tip in Samsung Side-by-Side refrigerators. While thawing the tip (Method 1) provides temporary relief, diagnosing and replacing a faulty valve is often necessary for a permanent solution to this ice maker freezing problem.