
Introduction:
This is Method 6 in our troubleshooting series for Samsung refrigerators experiencing cooling failures. If you’ve manually defrosted your evaporator (Method 4) and perhaps even checked or replaced the defrost thermostat or sensor (Method 5). However, the evaporator coil still ices up severely over time, and a faulty defrost heater is a prime suspect.
The defrost heater is an electrical element located directly beneath or interwoven with the evaporator coils. During an automatic defrost cycle, the control board sends power to this heater, which then melts the accumulated frost off the coils. If the heater is burned out or broken, the frost never melts, eventually turning the evaporator into a solid block of ice, completely stopping airflow and cooling.
Disclaimer: This is an advanced DIY repair. It involves significant disassembly, working near the evaporator, and testing or replacing an electrical heating component. ALWAYS UNPLUG YOUR REFRIGERATOR FROM THE POWER OUTLET before starting any disassembly, testing, or replacement. Defrost heaters can be fragile. If you are not comfortable with these steps or electrical testing, please consult a qualified appliance repair technician. We are not liable for any damage or injury.
When to Suspect a Faulty Defrost Heater:
- The evaporator coil consistently ices up completely, even after other defrost system components (like the thermostat/sensor) have been checked or deemed okay.
- The refrigerator or freezer compartment fails to cool due to a completely ice-blocked evaporator.
- You never hear any sizzling or dripping sounds that would typically accompany a defrost cycle (though this isn’t always obvious).
- A manual defrost (Method 4) provides cooling, but the problem returns quickly (within days to a couple of weeks, depending on humidity and usage).
Understanding the Defrost Heater:
- Function: Its sole purpose is to get hot enough during the defrost cycle to melt frost and light ice from the evaporator coils.
- Types: Can be a Calrod type (metal sheath, like an oven element) or a glass tube heater (more fragile). Samsung refrigerators often use Calrod-style heaters.
- Location: Almost always situated directly below or sometimes woven through the evaporator coil fins.
Tools & Materials You’ll Need:
- Screwdrivers (Phillips is standard).
- Multimeter (Essential for testing continuity/resistance).
- Towels.
- Flashlight.
- Replacement Defrost Heater: CRITICAL – Must be the exact part for your specific Samsung refrigerator model. Heaters have specific wattage and physical dimensions.
- Work Gloves (Recommended, as evaporator fins can be sharp).
Step-by-Step Guide:
Step 1: SAFETY FIRST – UNPLUG THE REFRIGERATOR!
- Disconnect your refrigerator from the electrical outlet.
Step 2: Access the Evaporator Coil and Defrost Heater
- This process is identical to accessing the evaporator for manual defrosting and checking the thermostat and sensor, as detailed in Methods 4 and 5.
- Empty the affected compartment (freezer or fridge).
- Remove the interior back panel (evaporator cover) to fully expose the evaporator coil and the defrost heater beneath it.
Step 3: Manually Defrost the Evaporator (If Necessary)
- If the evaporator coil is currently encased in ice, you must manually defrost it thoroughly (as detailed in Method 4) before you can safely remove or accurately test the defrost heater. The heater itself might be embedded in ice.
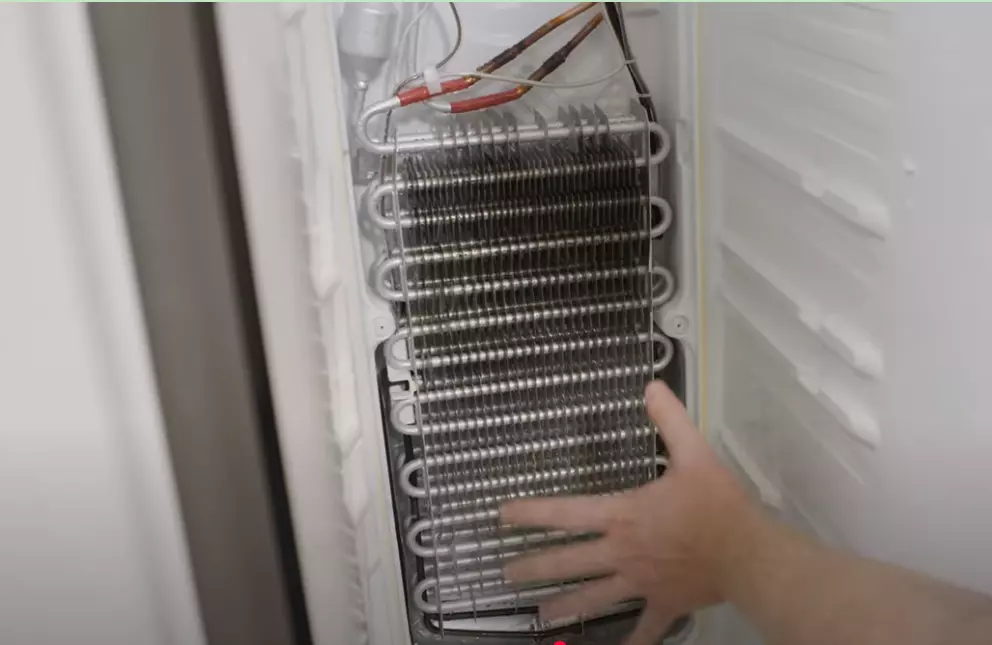
Step 4: Locate and Visually Inspect the Defrost Heater
- The defrost heater is typically a U-shaped or straight heating element running along the bottom of the evaporator coil, sometimes clipped to it.
- Visually inspect it for any obvious signs of damage:
- Breaks or cracks in the sheath (for Calrod type) or glass (for glass tube type).
- Burn marks or signs of overheating.
- Bulges or distortions.
- Even if it looks visually okay, it can still be faulty.
Step 5: Test the Defrost Heater with a Multimeter
- Disconnect Wires: Carefully disconnect the electrical wires leading to both ends of the defrost heater. These might be spade connectors or a plug-in harness. Note how they are connected.
- Set Multimeter: Set your multimeter to the resistance (Ohms Ω) setting. A low Ohms range (e.g., 200 Ω or 2 kΩ) is usually appropriate, or use auto-ranging if your meter has this feature.
- Test Resistance: Touch one multimeter probe to each terminal of the defrost heater.
- Good Reading: A functional defrost heater should show a specific resistance value. This value varies by heater but is typically somewhere between 20 and 120 Ohms (sometimes higher for larger heaters). The key is that it should exhibit consistent, measurable resistance, not be open or shorted. You may need to find the specification for your particular heater to obtain an exact expected value.
- Bad Reading (Most Common for Failure): “OL” (Open Line / Over Limit) or Infinite Resistance. This indicates the heating element wire inside is broken, and the heater needs to be replaced.
- Bad Reading (Less Common): Zero Ohms or Very Close to Zero. This indicates a short circuit in the heater, which also means it needs replacement and could potentially blow a fuse or damage the control board.
Step 6: Replacing a Faulty Defrost Heater
- Obtain the Correct Part: Ensure you have the exact replacement defrost heater specified for your Samsung refrigerator model.
- Removal:
- The heater is often held in place by metal clips or brackets. Carefully unclip or unfasten it from the evaporator coil.
- Note its precise positioning and routing.
- Installation:
- Install the new defrost heater in the same position and orientation as the old one. It needs to be close to the evaporator coils to effectively melt frost, but generally should not be in direct, prolonged contact with plastic parts unless designed to be.
- Secure it with any clips or brackets.
- Reconnect Wires: Securely reconnect the electrical wires to the terminals of the new defrost heater, ensuring a tight connection.
Step 7: Reassemble and Test
- While the evaporator cover is still off, ensure the defrost thermostat/sensor (Method 5) is correctly positioned and clipped to the evaporator coil.
- Reconnect any wiring harnesses to the evaporator cover panel.
- Carefully reinstall the interior back panel, ensuring all clips engage and screws are secured.
- Reinstall shelves, drawers, and food.
- Plug the refrigerator back in.
- Monitoring: It will take several defrost cycles (which occur automatically every 8-12+ hours) to confirm if the repair was successful. Monitor the evaporator area (you may need to briefly remove the panel again after a week or so if you’re unsure, but be very cautious) or look for a return of cooling problems/frosting. If the heater was the issue, the evaporator should now remain relatively frost-free between cycles.
Conclusion:
A failed defrost heater is a common reason for the evaporator in a Samsung refrigerator to become a solid block of ice, resulting in a complete loss of cooling. Testing for continuity and resistance with a multimeter and replacing it if faulty is a critical repair step. If the defrost heater, thermostat, and sensor are all good, but defrosting still doesn’t occur, the issue may lie with the main control board not sending power to the defrost circuit.