
Introduction:
Welcome to Method 4 in our Samsung refrigerator cooling troubleshooting series. If earlier checks like cleaning condenser coils (Method 1), clearing air vents (Method 2), and inspecting door seals (Method 3) haven’t resolved your cooling issues, or if you’re experiencing a complete lack of cold air in one or both compartments accompanied by significant frost buildup behind the interior panels, then a manual defrost of the evaporator coils and an inspection of the evaporator fan are crucial next steps.
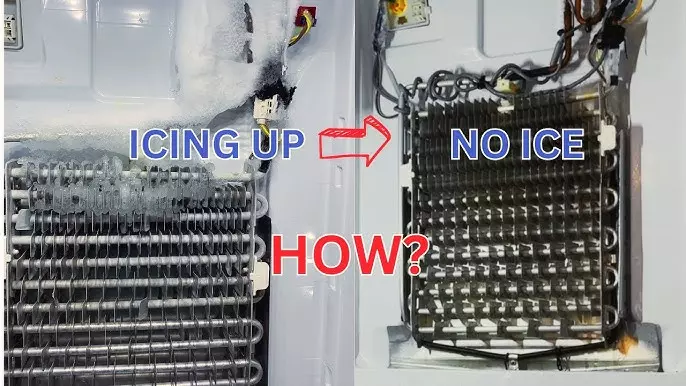
The evaporator coil is where the actual cooling takes place. A fan blows air over these cold coils to chill the compartment. If the defrost system fails, these coils can become completely encased in ice, blocking airflow and preventing the cooling process. The fan itself can also get jammed by this ice or fail independently. This guide will walk you through accessing these components, manually defrosting them, and checking the fan.
Disclaimer: This is an advanced DIY repair. It involves significant disassembly of the refrigerator’s interior and working near delicate components. ALWAYS UNPLUG YOUR REFRIGERATOR FROM THE POWER OUTLET before starting any disassembly. If you are not comfortable with these steps, please consult a qualified appliance repair technician. Damage to the evaporator coils or other components can be costly. We are not liable for any damage or injury.
When to Perform a Manual Evaporator Defrost and Fan Check:
- One or both compartments (fridge or freezer) are not cooling at all, or are significantly warmer than the set temperature.
- You hear the compressor running, but no cold air is circulating.
- You hear a clicking, scraping, or no sound at all from where the evaporator fan should be running (usually behind an interior panel).
- There’s excessive frost buildup visible on the interior back panel of the affected compartment(s).
- Forced defrost cycles (if your model has one) provide only temporary relief.
Understanding the Evaporator Coil and Fan:
- Evaporator Coil: A network of finned tubes that gets extremely cold as refrigerant passes through them. Air blown over these coils is what cools your food.
- Evaporator Fan: A motor-driven fan that circulates air within the compartment, drawing it over the cold evaporator coils and distributing the chilled air.
- The Problem: If the refrigerator’s automatic defrost system (heater, sensor, control board) malfunctions, frost continually builds up on the evaporator coils until they become a solid block of ice. This ice:
- Insulates the coils, preventing them from cooling the air effectively.
- Physically blocks airflow.
- Can encase and stop the evaporator fan from spinning.
Tools & Materials You’ll Need:
- Screwdrivers (Phillips is familiar, possibly others depending on your model).
- Putty Knife or Plastic Pry Tools (Optional but helpful): For gently releasing plastic panel clips.
- Hair Dryer (CRITICAL: Use on LOW or COOL heat setting ONLY).
- Lots of Towels and a Shallow Pan/Tray: To catch significant amounts of meltwater.
- Flashlight.
- Soft Brush (Optional): For cleaning fan blades once defrosted.
- Multimeter (Optional, for testing the fan motor if it doesn’t spin after defrosting).
Step-by-Step Guide:
Step 1: SAFETY FIRST – UNPLUG THE REFRIGERATOR!
- Disconnect your refrigerator from the electrical outlet. This is non-negotiable.
Step 2: Empty the Affected Compartment(s)
- Remove all food, shelves, and drawers from the compartment (freezer or refrigerator) where you suspect the evaporator is frosted. This will give you access to the interior back panel (evaporator cover).
- Side-by-Side Models: Typically feature separate evaporators and fans for the freezer and refrigerator. You’ll work in the compartment that’s not cooling.
- French Door Models: The central evaporator is typically located at the bottom of the freezer. Some have a second evaporator for the fresh food section, or use a damper system from the freezer. Identify which area is problematic.
Step 3: Remove the Interior Back Panel (Evaporator Cover)
- This panel is typically held in place by several screws (often Phillips head). Locate and remove all of them.
- There may also be plastic tabs or clips holding the panel in place. Use a putty knife or plastic pry tool to release these gently. Be careful not to crack the plastic.
- The panel may be slightly frozen in place if there is heavy icing.
- Once loose, carefully pull the panel away. Be aware of wiring connected to the evaporator fan or sensors on the panel. You may need to disconnect one or more wiring harnesses before you can entirely remove the panel. Take a photo of the connections if you’re unsure about reassembly.
Step 4: Inspect the Evaporator Coils and Fan
- With the panel removed, you will see the evaporator coil and the evaporator fan.
- Assess Icing: Are the coils completely covered in a thick layer of frost or solid ice? Is the fan blade also encased in ice or unable to turn due to surrounding ice?
- This visual confirmation is key.
Step 5: Manually Defrost the Evaporator Coils and Fan
- Place Towels: Position towels and a shallow pan at the bottom of the compartment to catch meltwater. This can be a lot of water.
- Hair Dryer (LOW/COOL Heat ONLY):
- Set your hairdryer to its lowest or cool heat setting. Direct the airflow over the iced-up coils and fan.
- Keep the hairdryer moving. Do not concentrate heat on one spot for too long, especially on plastic components or the delicate evaporator fins.
- This process can take a significant amount of time (30 minutes to several hours), depending on the severity of the icing. Be patient.
- As ice melts, use towels to sop up the water. You may need to empty the pan frequently.
- DO NOT USE SHARP OBJECTS to chip away at the ice. You can easily puncture the evaporator coil, which is a costly, professional-only repair (often involving the sealed system).
- Ensure all ice is melted from the coils, the fan blades, and the fan motor housing.
Step 6: Check the Evaporator Fan Motor and Blades
- Once all ice is cleared and the area is relatively dry:
- Manual Spin: Gently try to spin the fan blade with your finger. Does it spin freely and smoothly? If it feels stiff, gritty, or won’t turn, the motor might be damaged (either by the ice or an internal failure), or debris might be caught.
- Clean Blades: If the blades are just dirty, clean them gently with a soft brush.
- (Advanced Test)If the fan doesn’t run when power is restored (see next steps), and you’re comfortable, you can test the fan motor for continuity or voltage with a multimeter if its wiring is accessible; however, this is typically for more experienced users.
Step 7: Clear the Defrost Drain Hole
- While you have access, locate the defrost drain hole at the bottom of the trough beneath the evaporator coil. Ensure it’s clear of ice and debris. A clogged drain can cause defrost water to back up and refreeze, contributing to the problem. You can often clear it with warm water and a turkey baster or a flexible piece of wire (gently!). See the Addressing Defrost Drain
Step 8: Dry Thoroughly and Reassemble
- Use towels to dry the entire compartment, including the coils (as much as possible without causing damage), the fan, and the panel, as thoroughly as possible.
- Reconnect any wiring harnesses to the back panel.
- Carefully reinstall the interior back panel, ensuring all clips engage and screws are secured.
- Reinstall shelves, drawers, and food.
Step 9: Restore Power and Monitor
- Plug the refrigerator back in.
- Listen for the evaporator fan. You should hear it start running within a few minutes if it’s working.
- Allow several hours (4-24 hours) for the refrigerator to reach its set temperatures.
- Crucial Monitoring: This manual defrost is often a temporary fix. Suppose the underlying cause of the defrost system failure (e.g., faulty defrost heater, sensor, or control board) is not addressed. In that case, the evaporator will likely ice up again within days or weeks.
- If it freezes up again, you’ll need to proceed with testing the components of the automatic defrost system (covered in Methods 5 and 6 for cooling fixes).
Conclusion:
Manually defrosting the evaporator coils and checking the fan are critical steps when your Samsung refrigerator is severely frosted or not cooling properly. It removes the immediate blockage, allowing the fridge to cool temporarily and enabling you to assess fan operation. However, it’s vital to remember that this often uncovers a symptom of a failed automatic defrost system component, which will need to be diagnosed and repaired for a long-term solution.
Next, we’ll delve into testing the individual components of the defrost system, starting with Cooling Fix Method 5: Testing and Replacing the Defrost Thermostat/Sensor.