
Introduction:
Welcome to Method 8 in our Samsung refrigerator cooling troubleshooting series. If your refrigerator or freezer isn’t maintaining the correct temperature – perhaps it’s too warm or even too cold in certain areas despite correct settings – and you’ve already checked common culprits like airflow, coils, and the defrost system, a faulty compartment temperature sensor (thermistor) could be misleading the control board.
These sensors constantly monitor the air temperature inside the fresh food and freezer compartments. They send this information to the main control board, which then regulates the compressor and fan operation to maintain your set temperatures. If a sensor is inaccurate or fails, the control board receives incorrect data, resulting in poor temperature regulation and either inefficient cooling or overcooling.
Disclaimer: This is an advanced DIY repair. It involves locating and testing small electrical components, and potentially splicing wires if a direct plug-in replacement isn’t available. ALWAYS UNPLUG YOUR REFRIGERATOR FROM THE POWER OUTLET before starting any disassembly or testing. If you are not comfortable with these steps or electrical testing, please consult a qualified appliance repair technician. We are not liable for any damage or injury.
When to Suspect a Faulty Compartment Temperature Sensor:
- The refrigerator or freezer compartment is consistently too warm or too cold, despite the temperature settings on the control panel being standard.
- Temperatures fluctuate wildly within a compartment.
- The refrigerator runs too much or too little.
- You’ve ruled out airflow obstructions (Method 2), dirty condenser coils (Method 1), faulty door seals (Method 3), and major defrost system issues (Methods 4-6).
- Error codes related to temperature sensors might appear on some Samsung displays (check your user manual for error code meanings).
Understanding Compartment Temperature Sensors (Thermistors):
- Function: Thermistors are resistors whose electrical resistance changes predictably and precisely with temperature. The main control board interprets this resistance to determine the actual temperature inside each compartment.
- Location: There’s at least one in the fresh food compartment and one in the freezer compartment. They are often small, plastic-encased components with two wires, typically located near an air vent, on a side wall, or on the ceiling, often behind a small protective cover.
- Failure Mode: They can become inaccurate over time (drifting out of calibration), fail open (infinite resistance), or fail shorted (zero resistance), all of which send erroneous information to the control board.
Tools & Materials You’ll Need:
- Screwdrivers (Phillips or small flathead, depending on sensor cover).
- Multimeter (Essential for testing resistance).
- Flashlight.
- Replacement Temperature Sensor(s): CRITICAL – Must be the exact part for your specific Samsung refrigerator model. Different sensors have different resistance characteristics.
- Wire Strippers/Cutters & Waterproof Connectors (e.g., heat-shrink butt connectors – if the replacement sensor requires splicing).
- (Optional) Accurate Thermometer: To compare the actual compartment temperature with sensor readings indirectly.
- (Optional) Bowl of Ice Water: To test sensor resistance at a known temperature (approx. 32°F/0°C).
Step-by-Step Guide:
Step 1: SAFETY FIRST – UNPLUG THE REFRIGERATOR!
- Disconnect your refrigerator from the electrical outlet.
Step 2: Locate the Temperature Sensor(s) in the Affected Compartment
- Fresh Food Compartment Sensor: Often found near the top, on a side wall, or near an air inlet vent, sometimes behind a small plastic grille or cover that may snap off or be held by a small screw.
- Freezer Compartment Sensor: Similarly located, often on the back wall or ceiling, potentially near the evaporator fan housing or an air vent, and may also have a protective cover.
- Consulting a parts diagram for your specific Samsung model online can be very helpful in pinpointing their exact locations if they are not immediately apparent.
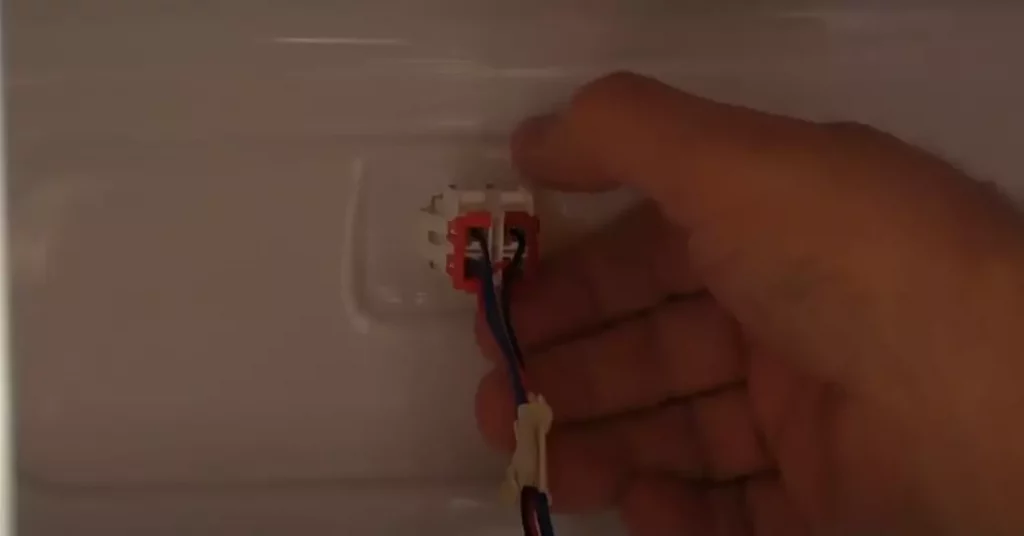
Step 3: Access and Disconnect the Sensor
- Carefully remove any cover protecting the sensor.
- Disconnect the wiring harness connector from the sensor. If there is no connector directly at the sensor, you may need to trace its wires back to a connector further away or prepare to cut and splice them if you are replacing the sensor.
Step 4: Test the Temperature Sensor with a Multimeter
- Set Multimeter: Set your multimeter to the resistance (Ohms Ω) setting. A range like 20kΩ or 50kΩ is usually appropriate, or use an auto-ranging feature.
- Note Temperature:
- Option A (Ambient): Note the approximate current air temperature of the compartment where the sensor was located (if the fridge has been off for a while, this will be room temperature).
- Option B (Ice Bath – More Accurate): For a more precise test, place the sensor tip (not the wires or connector) into a bowl of ice water for a few minutes. The temperature should be very close to 32°F (0°C).
- Measure Resistance: Touch one multimeter probe to each of the sensor’s two terminals or pins.
- Compare to Chart: Compare the resistance reading you get with a temperature/resistance chart specific to your Samsung refrigerator’s thermistors. These charts are crucial and can sometimes be found in service manuals or by searching online for “Samsung refrigerator thermistor resistance chart.” (You may need to identify the type of thermistor, such as 5kΩ or 10kΩ, at a reference temperature like 25°C.)
- Good Reading: The measured resistance should closely match the chart’s value for the noted temperature (within ~5-10% tolerance).
- Bad Reading:
- “OL” (Open Line) or infinite resistance: Sensor is open and bad.
- 0 Ohms or very close to zero: Sensor is shorted and bad.
- Reading significantly different from the chart value for the known temperature: Sensor is out of calibration and bad.
Step 5: Replacing a Faulty Temperature Sensor
- Obtain the Correct Part: Ensure you have the exact replacement sensor for your model.
- Installation:
- If the old sensor had a plug-in connector at its location, plug the new sensor in.
- If the old sensor was hardwired or the replacement requires splicing:
- Cut the wires of the old sensor, leaving enough length on the refrigerator side for splicing.
- Strip a small amount of insulation from the ends of the refrigerator wires and the new sensor wires.
- Securely connect the wires using waterproof wire connectors (heat-shrink butt connectors are highly recommended for the moist refrigerator environment). Ensure correct polarity if applicable (though most simple thermistors are not polarity sensitive, it’s good practice to match wire colors if possible or note original connections).
- Mounting: Place the new sensor back into its original mounting position and re-secure any cover. Ensure it’s positioned to accurately sense the compartment air, not touching cold coils directly unless it’s designed to do so.
Step 6: Reassemble and Test
- If you removed any larger panels for access (unlikely for just a compartment sensor, but possible), reinstall them.
- Plug the refrigerator back in.
- Set your desired temperatures on the control panel.
- Allow several hours (4-24 hours) for the refrigerator to stabilize. Use an appliance thermometer to verify if the compartment is now reaching and maintaining the set temperature more accurately.
Conclusion:
Faulty compartment temperature sensors can send incorrect information to your Samsung refrigerator’s control board, leading to erratic or inefficient cooling. Testing their resistance against a temperature chart and replacing them if they are out of specification can restore proper temperature regulation and solve many “too warm” or “too cold” issues.