
Introduction:
Welcome to Method 5 of our Samsung refrigerator cooling solutions series. If you’ve manually defrosted your evaporator coils (as per Method 4) only to have them ice up again quickly, a faulty defrost thermostat (bi-metal) or defrost sensor (thermistor) is a very common culprit. These components play a crucial role in regulating the automatic defrost cycle.
The defrost thermostat/sensor monitors the temperature of the evaporator coils. It signals the control board when the coils are cold enough to need defrosting and, importantly, when the defrost heater has raised the temperature sufficiently to melt the frost (at which point it signals to terminate the heating). If either of these components fails, the defrost cycle may not initiate, may not run long enough, or may run too long, resulting in persistent evaporator icing and subsequent cooling issues.
Disclaimer: This is an advanced DIY repair. It involves disassembly, working near the evaporator, and testing electrical components with a multimeter. ALWAYS UNPLUG YOUR REFRIGERATOR FROM THE POWER OUTLET before starting any disassembly or testing. If you are not comfortable with these steps, electrical testing, or component replacement, please consult a qualified appliance repair technician. Incorrectly wiring or replacing components can cause further damage. We are not liable for any damage or injury.
When to Suspect a Faulty Defrost Thermostat or Sensor:
- The evaporator coil repeatedly ices up and becomes severely clogged after manual defrosting.
- The refrigerator or freezer compartment is not cooling properly due to restricted airflow from an iced-up evaporator.
- You’ve ruled out simpler causes, such as blocked vents or dirty condenser coils.
- The defrost heater itself has been tested and is known to be good (see Method 6).
Understanding the Defrost Thermostat and Defrost Sensor:
- Defrost Thermostat (Bi-metal Thermostat):
- Function: This is an older style component. It’s a temperature-sensitive switch. When the evaporator coil reaches a very cold temperature (below a certain threshold, e.g., around 15-30°F or -9 to -1°C), the bi-metal contacts inside close, completing the circuit to the defrost heater if the control board initiates a defrost cycle. When the evaporator warms up sufficiently during defrost (e.g., to around 40-50°F or 4-10°C), the contacts open, cutting power to the heater.
- Failure Mode: Can fail “open” (never closing to allow the heater to turn on) or, less commonly, “closed” (heater stays on too long, though other safeties usually prevent this).
- Defrost Sensor (Thermistor):
- Function: This is more common in modern refrigerators. A thermistor is a resistor whose resistance changes in a predictable manner with temperature. The control board reads this resistance to determine the evaporator coil’s temperature and decide when to start and stop the defrost heater.
- Failure Mode: Can become inaccurate, providing false temperature readings to the control board, or fail (open or shorted).
Tools & Materials You’ll Need:
- Screwdrivers (Phillips is common).
- Multimeter (Essential for testing).
- Wire Strippers/Cutters & Connectors (e.g., wire nuts, butt connectors – if replacing a sensor that needs to be spliced).
- Towels.
- Flashlight.
- Replacement Defrost Thermostat or Defrost Sensor: Ensure it’s the EXACT part for your specific Samsung refrigerator model.
- (Optional) Bowl of Ice Water & Thermometer: For testing thermistor accuracy.
Step-by-Step Guide:
Step 1: SAFETY FIRST – UNPLUG THE REFRIGERATOR!
- Disconnect your refrigerator from the electrical outlet.
Step 2: Access the Evaporator Coil and Defrost Components
- This is the same procedure as in Method 4: Manual Defrost & Evaporator Fan Check.
- Empty the affected compartment (freezer or fridge).
- Remove the interior back panel (evaporator cover) to expose the evaporator coil.
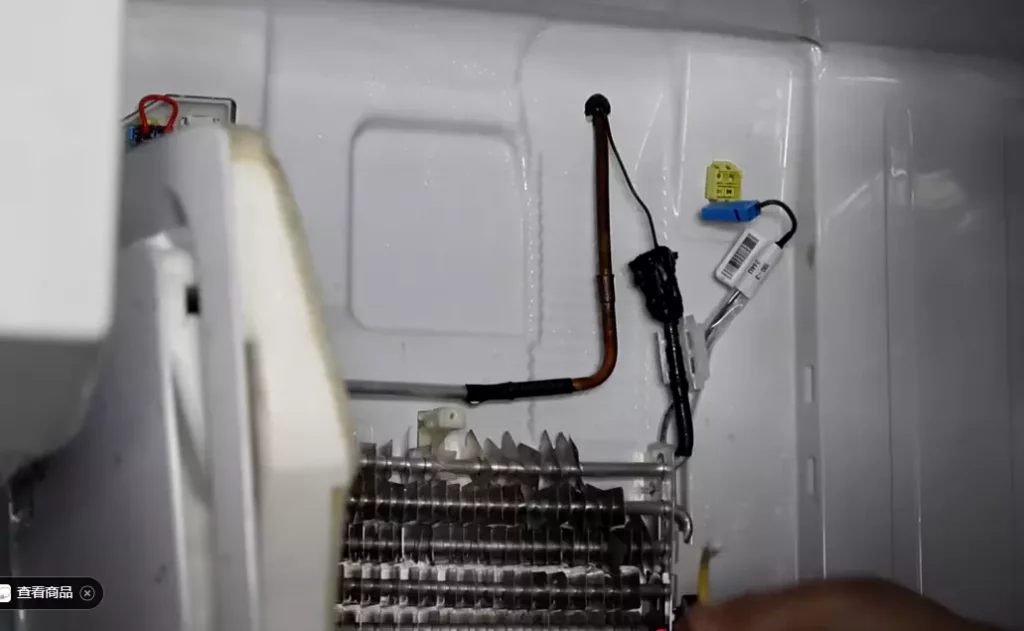
Step 3: Locate the Defrost Thermostat and/or Defrost Sensor
- Defrost Thermostat (Bi-metal): Usually a small, round or rectangular device, often with two wires, clipped directly onto one of the evaporator coil tubes. It might be enclosed in a small plastic pouch or heat-shrink tubing.
- Defrost Sensor (Thermistor): Also typically a small component with two wires, often with a plastic probe-like end, clipped to the evaporator coil or sometimes inserted into a fin.
- Your refrigerator might have one or the other, or in some complex systems, variations. If you see both, the bi-metal thermostat often acts as a safety cut-off in conjunction with a thermistor. Note their original positions and how they are mounted.
Step 4: Manually Defrost (If Iced Up)
- If the evaporator is heavily iced, you must manually defrost it completely (as detailed in Method 4) before you can accurately test or easily replace these components.
Step 5: Testing the Defrost Thermostat (Bi-metal)
- Disconnect Wires: Carefully disconnect the two wires leading to the defrost thermostat.
- Test for Continuity (When COLD):
- The thermostat needs to be very cold for this test (below its closing temperature, typically well below freezing). If you’ve just defrosted, you may need to cool it down again (e.g., place it in a bag and put it in another working freezer for 10-15 minutes, or use a circuit cooler spray if available).
- Set your multimeter to the continuity setting (often looks like a sound wave or diode symbol).
- Touch one probe to each of the thermostat’s terminals.
- Good Reading: If the thermostat is cold enough and functioning properly, it should display continuity (the multimeter will beep or indicate a very low resistance, close to 0 Ohms).
- Bad Reading: If it shows no continuity (OL or infinite resistance) when it’s definitely cold enough to be closed, it’s faulty and needs replacement.
- Test for Open (When WARM):
- Allow the thermostat to warm up to room temperature (or gently warm it in your hand).
- Continuity test again.
- Good Reading: It should now show no continuity (OL or infinite resistance).
- Bad Reading: If it still shows continuity when warm, it’s stuck closed and needs replacement (although this is less common, it can cause overheating).
Step 6: Testing the Defrost Sensor (Thermistor)
- Disconnect Wires: Carefully disconnect the two wires leading to the thermistor.
- Test Resistance:
- Set your multimeter to the resistance (Ohms Ω) setting (often 20kΩ or auto-ranging).
- Note the approximate current temperature of the thermistor (e.g., room temperature, or if you’ve cooled it in ice water, ~32°F/0°C).
- Touch one probe to each of the thermistor’s terminals.
- Compare the resistance reading to a temperature/resistance chart specific to your Samsung refrigerator’s thermistor. These charts can sometimes be found in service manuals or online by searching for “Samsung refrigerator thermistor chart.”
- Good Reading: The resistance should be within about 5-10% of the value specified on the chart for that temperature. For example, a common 5kΩ thermistor might read around 13-16kΩ at ~32°F/0°C and around 5kΩ at room temp (~77°F/25°C).
- Bad Reading: If the reading is OL (open), 0 Ohms (shorted), or significantly out of range according to the chart, the thermistor is faulty and needs replacement.
Step 7: Replacing a Faulty Defrost Thermostat or Sensor
- Obtain the Correct Part: Ensure you have the exact replacement for your model.
- Mounting: Remove the old component from its clip or mounting. Note its orientation. Mount the new component in the same location and orientation. It must make good thermal contact with the evaporator coil.
- Wiring:
- Defrost Thermostat: Reconnect the wires to the new thermostat’s terminals.
- Defrost Sensor (Thermistor): Some thermistors come with plug-in connectors. Others may require you to cut the wires of the old sensor (leaving some length) and splice the new sensor’s wires using waterproof wire connectors (e.g., heat-shrink butt connectors are best for the moist environment). Ensure secure, insulated connections. Follow any instructions included with the new sensor.
another video about Samsung Refrigerator – Thermostat and Defrost Heater Removal and Replacement
Step 8: Reassemble and Test
- Reconnect any wiring harnesses to the evaporator cover panel.
- Carefully reinstall the interior back panel.
- Reinstall shelves, drawers, and food.
- Plug the refrigerator back in.
- Allow several hours for the refrigerator to stabilize. It will take at least one or two full cooling/defrost cycles (8-24 hours) to determine if the issue is resolved and the evaporator remains frost-free.
Conclusion:
A faulty defrost thermostat or sensor is a primary cause of failed automatic defrost cycles, resulting in a heavily iced-up evaporator and inadequate cooling in your Samsung refrigerator. Testing these components with a multimeter and replacing them if they are defective is a common and effective repair method. If this doesn’t resolve the recurring icing issue, the defrost heater (Method 6) or the main control board may be the next steps to investigate.