
Introduction:
This is Method 3 in our series for troubleshooting Samsung refrigerator cooling problems. If you’ve cleaned the condenser coils (Method 1) and ensured clear air vents (Method 2), but your refrigerator still struggles to maintain its set temperature or runs excessively, worn-out or damaged door seals (also known as gaskets) could be the culprit. These seals are critical for keeping the cold air in and the warm, moist room air out.
A compromised door seal allows cold air to escape and warm air to enter, forcing your refrigerator’s cooling system to work much harder. This leads to inefficient cooling, higher energy bills, and can even contribute to frost buildup inside due to increased moisture. This guide will show you how to test your door seals and provide an overview of the replacement process if needed.
Disclaimer: This guide is for informational purposes. Testing door seals is generally safe. Replacing them can be a moderately easy DIY task, but it requires careful attention to ensure the new seal is installed correctly. If replacing, consider if you are comfortable with this task; otherwise, consult a qualified appliance repair technician. We are not liable for any damage or issues arising from improper testing or installation.
When to Suspect Faulty Door Seals:
- The refrigerator or freezer compartment isn’t as cold as it should be, despite other checks.
- The refrigerator runs almost constantly.
- You notice condensation or moisture on the edges of the refrigerator cabinet where the door meets it, or even on the seal itself.
- There’s visible frost buildup near the door edges inside the compartment.
- The door seal is visibly torn, cracked, brittle, misshapen, or has sections that are loose or not making contact with the cabinet.
- You can feel cold air escaping around the door when it’s closed.
Why Are Good Door Seals Essential?
Door seals create an airtight barrier between the cold interior of your refrigerator and the warmer, more humid air of your kitchen.
- Maintains Cold Temperature: Prevents cold air from leaking out.
- Keeps Warm Air Out: Prevents warm, moist room air from entering, which would add to the cooling load and introduce moisture that can turn into frost.
- Energy Efficiency: A good seal means the compressor runs less, saving energy.
- Prevents Condensation: Reduces the chance of condensation forming on cold surfaces where warm air meets them.
Tools & Materials You’ll Need:
- A Piece of Paper or a Dollar Bill: For the seal test.
- Mild Soap and Water Solution & Soft Cloth: For cleaning seals.
- Flashlight (Optional): For visual inspection.
- Replacement Door Seal(s) (If needed): Ensure you order the EXACT seal for your specific Samsung refrigerator model and door (e.g., left fresh food door, right fresh food door, freezer drawer).
- Nut Driver or Screwdriver (Possibly, for some seal replacement methods): Some seals are held by screws under a retainer strip.
- Hair Dryer (LOW heat – for shaping new seals, if necessary).
Step-by-Step Guide to Testing and Addressing Door Seals:
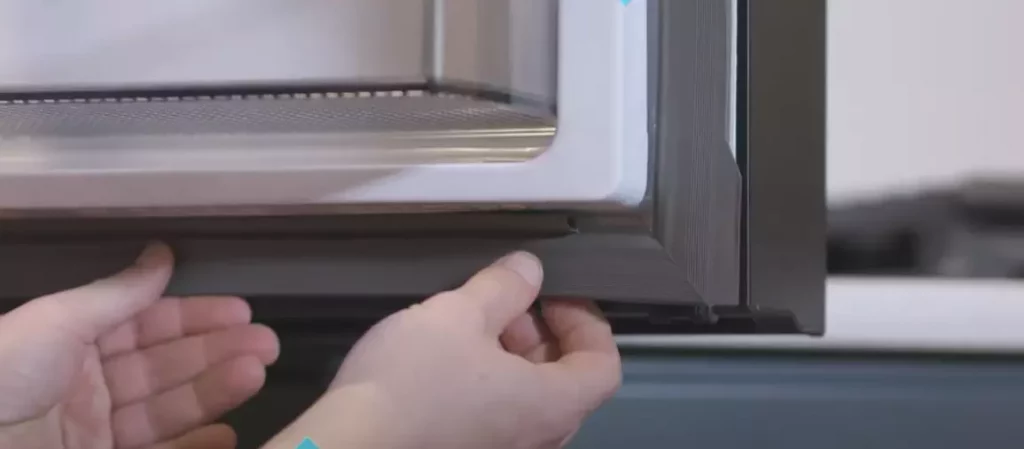
Step 1: Visual Inspection
- Open each refrigerator and freezer door/drawer.
- Carefully inspect the entire length of each door seal. Look for:
- Tears, rips, or cracks.
- Areas that are flattened, twisted, or misshapen.
- Any brittleness or hardening of the rubber.
- Sections where the seal is pulling away from the door or doesn’t look like it would make even contact with the cabinet.
- Sticky residue or mold/mildew buildup.
Step 2: The Paper Test (Dollar Bill Test)
- Open a refrigerator door.
- Place a piece of paper (or a dollar bill) halfway across the seal, so part is inside and part is outside.
- Close the door normally.
- Try to pull the paper out gently.
- Good Seal: You should feel noticeable resistance or drag when pulling the paper.
- Poor Seal: If the paper slides out very easily with little to no resistance, that section of the seal is likely not making good contact.
- Repeat this test at several points around each door (top, bottom, and both sides, especially near corners and hinges). Pay close attention to any areas that looked suspect during your visual inspection.
Step 3: Clean the Door Seals
- Sometimes, a sticky or dirty seal can prevent proper contact.
- Prepare a solution of mild dish soap and warm water.
- Use a soft cloth or sponge dipped in the solution to thoroughly clean all surfaces of the door seals, including the flexible folds.
- Also, clean the surface of the refrigerator cabinet where the seal makes contact.
- Rinse with a clean, damp cloth and dry thoroughly.
- After cleaning, re-test any suspect areas with the paper test. Sometimes a good cleaning is all that’s needed.
Step 4: Addressing Minor Seal Issues (Temporary Fixes – Not consistently practical)
- Warped Seal: If a section of the seal appears slightly misshapen but not torn, you can attempt to gently reshape it by carefully warming it with a hairdryer on a low heat setting (do not overheat or melt it) and then manually molding it back into place. Close the door and let it sit for a moment to see if it retains the new shape. This is often a temporary fix.
- Petroleum Jelly (Very Temporary): Applying a thin layer of petroleum jelly to a dry, clean seal can sometimes improve sealing for a short period, but it’s not a long-term solution and can attract dirt.
Step 5: Replacing a Damaged Door Seal (Overview)
If your visual inspection or paper test reveals a significantly damaged, torn, or non-sealing gasket, replacement is the best solution.
- Order the Correct Seal: This is critical. You need the exact replacement seal for your Samsung model and the specific door (e.g., fresh food left, fresh food right, freezer). Seals are not interchangeable.
- Prepare the New Seal: New seals often come folded or coiled. It’s best to unpack the new seal and let it sit at room temperature for several hours (or gently warm it with a hairdryer on low) to help it regain its proper shape before installation.
- Remove the Old Seal:
- Most modern Samsung door seals are “press-in” or “dart-style.” They fit into a channel or groove around the perimeter of the door. Start at a corner and firmly but gently pull the old seal out of its channel.
- Some older or different designs might have the seal held in by a metal or plastic retainer strip secured with screws. In this case, you’d need to loosen or remove the screws to release the retainer and then the seal.
- Clean the Channel: Once the old seal is removed, thoroughly clean the channel in the door where the new seal will be installed.
- Install the New Seal:
- Starting at a top corner, press the dart or flange of the new seal firmly into the channel. Work your way around the entire perimeter of the door, ensuring the seal is fully seated and not twisted or bunched up.
- The corners often require a bit more attention to ensure they are correctly seated.
- If a retainer strip held your seal, carefully tuck the new seal under the retainer and re-secure the screws.
- Check the New Seal: Close the door and inspect the new seal. It should make contact all around. Perform the paper test again to confirm a good seal.
- If a new press-in seal appears slightly wavy or not perfectly flat initially, closing the door and allowing it to sit for 24-48 hours will usually help it conform. You can also gently warm stubborn spots with a hairdryer on its lowest setting and then close the door.
Expected Results:
- A tighter seal around the doors.
- Improved temperature stability inside the refrigerator.
- Reduced compressor run time and energy savings.
- Less condensation and frost buildup near the doors.
Conclusion:
Intact and properly sealing door gaskets are crucial for maintaining your Samsung refrigerator’s optimal cooling performance and energy efficiency. Regularly testing and cleaning them, and replacing them when damaged, is a key maintenance task that can resolve many “not cooling well” issues.
Suppose your cooling problems persist after ensuring good seals, clean coils, and clear vents. In that case, you’ll need to investigate other components, which we’ll cover in Cooling Fix Method 4: Manually Defrosting & Checking the Evaporator Fan.