Introduction:
Welcome to Method 9 in our series on resolving ice maker freezing issues in your Samsung French Door refrigerator. If you’ve addressed sealing, defrost systems, and drainage, but your ice maker compartment still tends to freeze up, a malfunctioning or ice-obstructed ice room fan could be a contributing factor.
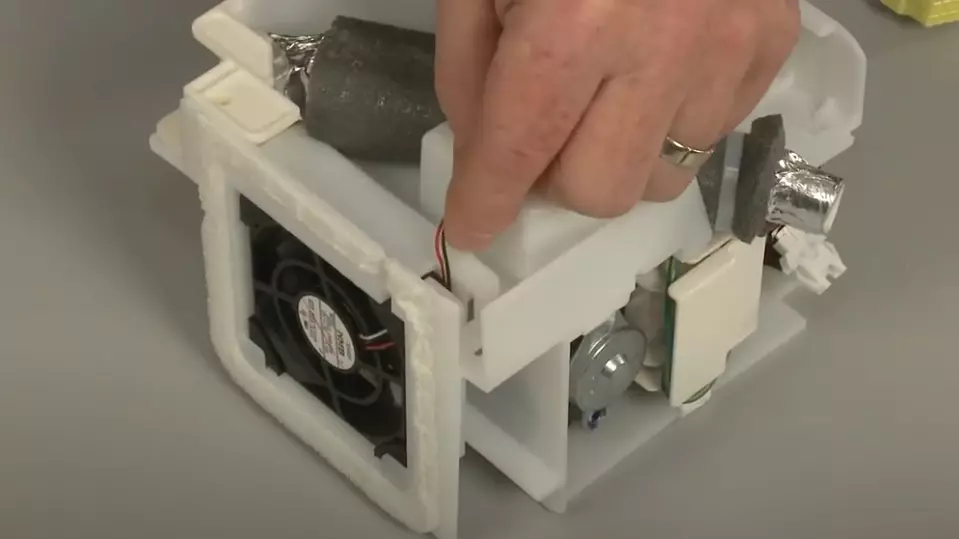
Many Samsung French Door ice maker compartments have a small, dedicated fan designed to circulate cold air within the ice room. This ensures consistent temperatures for efficient ice production and helps prevent frost from settling. If this fan becomes blocked by ice or its motor fails, air circulation is compromised, which can lead to an unstable environment prone to excessive frosting and freezing of the ice maker itself.

Disclaimer: This guide is for informational purposes. This repair involves accessing internal components. Always unplug your refrigerator from the power outlet before attempting any disassembly or repair. If you are uncomfortable with these steps or if accessing the fan requires extensive disassembly beyond the ice maker unit, please consult a qualified appliance repair technician. We are not liable for any damage or injury.
When to Suspect an Ice Room Fan Issue:
- The ice maker compartment is excessively frosty or icy, even after attempting other fixes like sealing (Method 1).
- You no longer hear the faint whirring of a small fan coming from the ice maker area (if you were previously able to listen to it).
- Upon removing the ice maker assembly (as detailed in previous methods), you can visually see ice obstructing the fan blades or their housing.
- Ice production is very slow, and there’s evidence of general icing within the ice maker compartment, not just localized to the fill tube or mold.
What is the Ice Room Fan and How Does it Help Prevent Freezing?
The ice room fan is a small circulation fan located within or immediately adjacent to the ice maker compartment. Its job is to:
- Distribute Cold Air: It evenly circulates the ultra-cold air generated for the ice-making process throughout the ice room.
- Maintain Consistent Temperature: This helps keep the ice maker and stored ice at the optimal freezing temperature.
- Minimize Frost Stagnation: Moving air helps prevent moisture from settling on surfaces and forming frost. If the fan is not working, stagnant air can lead to quicker frost buildup and eventually ice that can jam the fan itself or the ice maker.
Step-by-Step Guide to Checking and Clearing the Ice Room Fan:
Step 1: SAFETY FIRST – UNPLUG THE REFRIGERATOR!
- Disconnect your refrigerator from the electrical outlet.
Step 2: Access the Ice Maker Compartment & Fan Area
- Remove the ice bucket.
- To access the ice room fan, you will almost certainly need to remove the entire ice maker assembly. The fan is usually located behind or integrated into the housing that holds the ice maker.
Step 3: Locate and Inspect the Ice Room Fan
- Once the ice maker assembly is out, carefully examine the area where it was mounted, or the assembly itself, for a small fan unit.
- Visual Inspection:
- Are the fan blades or the motor housing visibly encased or obstructed by ice?
- Are there any debris (e.g., label fragments, plastic pieces) caught in the blades?
- Do the fan blades appear damaged or broken?
- Manual Spin Test (Gentle!):
- If there’s no visible ice obstruction, gently try to spin the fan blades with your finger. Do they spin freely or feel stiff, gritty, or completely seized?
Step 4: Defrost the Fan and the Surrounding Area (If Iced Up)
- If the fan is iced up, use your hairdryer on its LOWEST/COOL heat setting to carefully melt the ice.
- Direct the airflow from a safe distance, keeping it moving to avoid overheating any plastic components.
- Use towels to absorb meltwater.
- Ensure the fan motor housing and blades are completely free of ice.
Step 5: Clean the Fan Blades
- Once defrosted and dry, use a soft brush to gently clean any dust or light debris from the fan blades.
Step 6: Reassemble
- Carefully reinstall the ice maker assembly, ensuring all wiring is reconnected and components are seated correctly.
- Install the ice bucket.
Step 7: Power Up and Monitor
- Plug the refrigerator back into the power outlet.
- Turn the ice maker function ON.
- Listen (if possible): After a few minutes, try to listen near the ice maker compartment. If it’s now operational, you might be able to hear the faint sound of the fan running. (This can be difficult to discern over other refrigerator noises.)
- Observe ice production and check for recurring frost in the ice maker compartment over the next few days.
Important Considerations:
- Fan Motor Failure: If the fan was not iced up but did not spin freely or doesn’t run after defrosting and re-powering, the fan motor itself may have failed. Ice room fans are often part of the larger ice maker assembly or a specific housing component and may require replacing that entire assembly if the motor is bad. Click here to buy a new Samsung fridge Fan Motor.
- Cause of Fan Icing: If the fan was iced up, it’s important to consider why. Often, a fan freezing over is a symptom of an air leak into the ice maker compartment (see Method 1: Sealing) or an issue with a localized defrost mechanism if the ice room has one (less common for just the fan itself). The fan getting iced usually means moist air is getting to it.
- Delicate Blades: Fan blades can be fragile. Handle them gently.
Conclusion:
A functioning ice room fan is important for maintaining the proper environment within your Samsung ice maker compartment. If it’s obstructed by ice or has failed, it can contribute to the freezing problems you’re trying to solve. Checking, defrosting, and ensuring the fan is operational are key steps in comprehensive ice maker troubleshooting.
