
Introduction:
This is Method 7 in our comprehensive series dedicated to solving ice maker freezing issues in Samsung French-door refrigerators. If you’ve addressed air leaks (Method 1) and main defrost system problems (Methods 4 & 5) and are still finding ice forming specifically within or directly beneath the ice maker assembly, a blocked or frozen defrost drain for the ice maker area could be the culprit.
Some ice maker designs, or the compartments they sit in, may have their own small, localized way of dealing with condensation or minor meltwater (perhaps from a minimal internal defrost cycle if the ice maker unit is advanced). If this specific drainage path becomes clogged with ice or debris, water can pool and refreeze, contributing to the ice buildup around the ice maker. This is distinct from the main refrigerator defrost drain (covered in Method 5), though the principle of ensuring clear drainage is similar.
Disclaimer: This guide is for informational purposes. This repair involves accessing internal components, and the presence and accessibility of a dedicated ice maker area drain vary significantly by model. Always unplug your refrigerator from the power outlet before attempting any disassembly or repair. Consult a qualified appliance repair technician if unsure or cannot locate such a drain. We are not liable for any damage or injury.
When to Suspect a Clogged Ice Maker Compartment Drain:
- Ice consistently forms directly under the ice maker assembly or at the bottom of the compartment.
- The ice buildup looks localized to the ice maker unit rather than a widespread frosting issue in the entire fresh food compartment.
- You’ve already addressed air sealing (Method 1) and ensured the main refrigerator defrost drain (Method 5) is straightforward, but ice still forms around the ice maker.
- This method is often more exploratory, for persistent, localized ice when other common causes have been ruled out.
Step-by-Step Guide to Clearing the Ice Maker Compartment Drain:
Step 1: SAFETY FIRST – UNPLUG THE REFRIGERATOR!
- Disconnect your refrigerator from the electrical outlet.
Step 2: Access the Ice Maker Compartment Interior
- Remove the ice bucket.
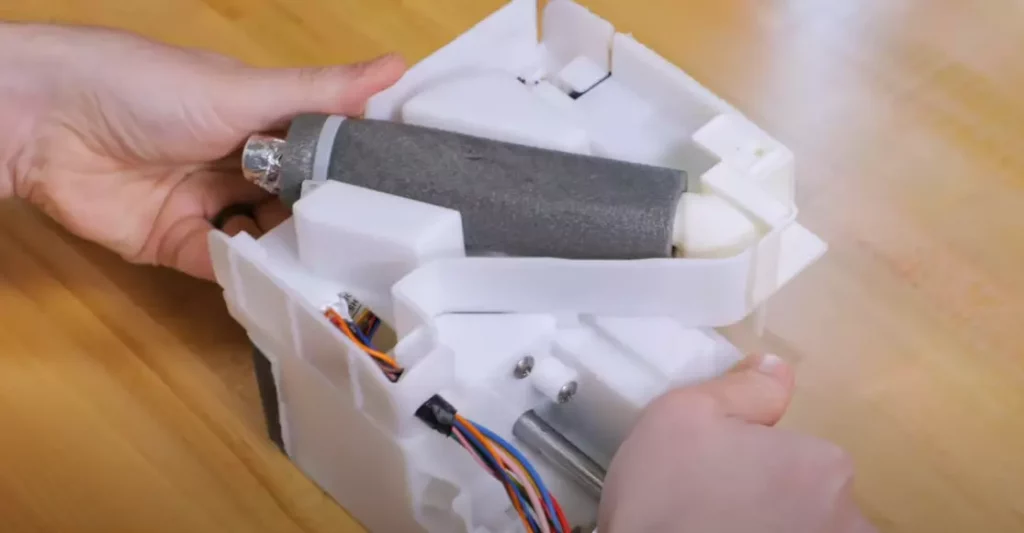
- Remove the entire ice maker assembly to inspect and thoroughly assess any potential drain.
Step 3: Locate the Ice Maker Area Drain Hole/Channel (If Present)
- With the ice maker assembly removed, carefully inspect the empty compartment’s floor and lower back wall with your flashlight.
- Look for any small hole, channel, recess, or trough designed to allow water to drain away.
- Note: Not all Samsung ice maker compartments will have an obvious, distinct drain hole separate from the main refrigerator drain. Some rely on the integrity of the sealed ice room, with any condensation or minor meltwater expected to be managed by the main fridge defrost or evaporate.
- If no distinct drain opening is found in the compartment liner, this method may not directly apply in the traditional sense of clearing a tube. In such cases, ensure the compartment bottom is sloped correctly (if designed that way) and that there’s no debris preventing general drainage towards the main fridge drain area if they are connected.
Step 4: Clear Ice and Debris from the Drain Path
- Melt Ice: If you find a drain opening clogged with ice, use your hairdryer on its LOWEST/COOL heat setting to gently melt the ice. Absorb the meltwater with towels. You can also use a syringe to direct small amounts of warm water onto the ice.
- Probe Gently: Once the ice is melted, take your flexible wire or small tubing and gently try to insert it into the drain opening to dislodge any soft debris or remaining ice slush. DO NOT FORCE IT, as you could puncture the drain tube or liner. The goal is to ensure a clear passage.
- Flush with Warm Water: Using your turkey baster or syringe, slowly pour some warm (not hot) water into the drain opening or the trough. The water should drain away. If it backs up, there’s still a blockage.
- A very mild dish soap and water solution can sometimes help break down greasy buildup, followed by a plain water flush.
Step 5: Thoroughly Dry the Compartment
- After clearing the drain (or attempting to), use towels and paper towels to meticulously dry the entire ice maker compartment. Any remaining moisture can refreeze.
- Allow the compartment to air dry with the fridge door open.
Step 6: Reassemble
- Carefully reinstall the ice maker assembly, ice duct tray, wiring, and wire housing cover, following the reverse order of disassembly.
- Install the ice bucket.
Step 7: Power Up and Monitor
- Plug the refrigerator back into the power outlet.
- Turn the ice maker function ON.
- Allow several hours for temperatures to stabilize and ice production to resume.
- Monitor the area for signs of recurring localized ice buildup.
Important Considerations:
- Drain Existence & Accessibility: This is the most significant variable. Some models may not have a user-accessible separate drain for the ice maker area. The “drainage” might be an integrated design feature.
- Gentle Probing: If you find a drain hole, be extremely gentle when probing it to avoid damage.
- Root Cause: If the drain was clogged with ice, consider why it froze. Is it related to the main refrigerator’s defrost cycle (Method 5 might be relevant) or an issue with the ice maker’s micro-environment?
Conclusion:
For persistent ice buildup localized directly within or under the ice maker assembly, checking for and clearing a dedicated compartment drain (if your model has one) can be necessary. This ensures that any condensation or minor meltwater specific to this area can properly escape, preventing it from pooling and refreezing.
Next in our series, we will examine how issues with the water fill tube can directly cause freezing inside the ice maker – Method 8: Checking the Fill Tube for Drips or Spray.