
Introduction:
Continuing our series on resolving Samsung French Door Refrigerator ice maker freezing issues, this article (Method 3) details how to perform a thorough manual defrost and cleaning. This method is more hands-on than the Forced Defrost cycle (Method 2). It is necessary when you have significant, stubborn ice buildup that prevents the ice maker from functioning or needs to be cleared before attempting other repairs, like sealing (Method 1).
Manually defrosting lets you obliterate all ice and frost, ensuring a clean slate. However, like Method 2, it addresses the symptom (the ice) rather than the root cause. If the underlying issue isn’t fixed, the problem will likely return.
Disclaimer: This guide is for informational purposes. You will be working near electrical components and water. Always unplug your refrigerator from the power outlet before cleaning or disassembling it. If unsure about any step, please consult a qualified appliance repair technician. We are not liable for any damage or injury that may occur.
When to Perform a Thorough Manual Defrost:
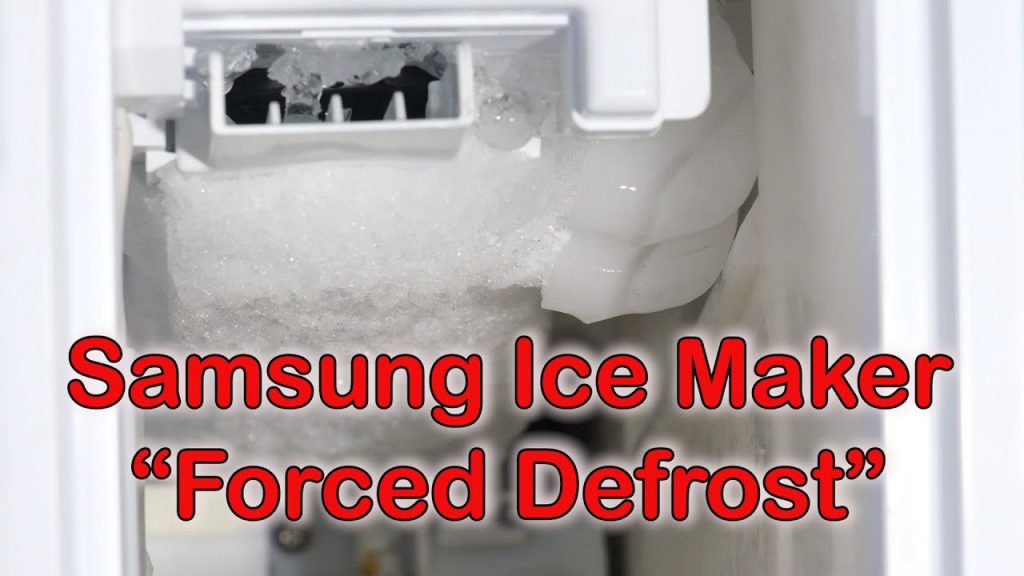
- The Forced Defrost cycle (Method 2) did not clear all the ice.
- A visible, thick layer of ice encases the ice maker, auger motor, or is inside the compartment.
- You are preparing to perform a more permanent fix, such as sealing the compartment (Method 1) or replacing components, and require an obvious and dry working area.
- You suspect a blocked drain or other issue hidden by ice.
Tools & Materials You’ll Need:
- Hair Dryer (CRITICAL: Only use on LOW or COOL heat setting).
- Steamer (Optional, but very effective): Dupray Neat Steam Cleaner. Use with caution around any exposed wiring.
- Lots of Towels and Sponges: To absorb melting ice and water.
- Plastic Putty Knife or Non-Metallic Scraper (Optional): This tool gently dislodges large, already loosened pieces of ice. Never use sharp metal objects.
Step-by-Step Guide to Manually Defrosting the Ice Maker:
Step 1: Safety First – UNPLUG THE REFRIGERATOR!
- Before doing anything else, disconnect your refrigerator from the electrical outlet. This is essential for your safety.
Step 2: Empty and Prepare the Area
- Turn off the ice maker function via the control panel (if possible before unplugging).
- Remove the ice bucket and discard all ice.
- Place several towels inside the refrigerator, beneath the ice maker compartment, and on the shelf below, to catch any melting water. You may also want to place towels on the floor in front of the fridge.
Step 3: Access the Iced-Up Components
- With the ice bucket removed, you’ll have a direct view of the ice maker and its compartment.
- If your ice maker’s front plastic cover is easily removable (often with one or two Phillips screws, as seen in some repair videos), carefully remove it to get better access to the internal components. This is often where ice buildup is most severe.
Step 4: The Defrosting Process – Patience is Key!
- Using a Hair Dryer:
- Set your hair dryer to its LOWEST or COOL heat setting. NEVER use high heat, as this can easily warp or melt the plastic components of the ice maker and refrigerator liner, causing permanent damage.
- Direct the gentle airflow towards the iced-up areas. Keep the hairdryer moving continuously; do not focus it on one spot for too long.
- As ice melts, use towels to absorb the water.
- Using Warm Water and Towels (Alternative/Complementary):
- Soak a towel in warm (not scalding hot) water, wring it out well, and place it directly onto the ice. This can help melt stubborn ice. Replace the towel as it cools.
- Be careful to prevent excessive water from dripping onto any visible wiring or electronic components.
- Using a Steamer (Optional):
- A household steamer can be very effective at melting ice quickly, such as the Dupray Neat Steam Cleaner.
- Use it carefully, directing the steam at the ice. Again, avoid prolonged exposure to plastic and exercise extreme caution around any wiring.
- Gently Removing Loosened Ice:
- As larger chunks of ice begin to loosen, you can gently try to remove them with your gloved fingers or a plastic (non-metallic) putty knife or scraper.
- NEVER chip, chisel, or pry forcefully at the ice, especially with metal tools. If present and exposed, you can easily damage delicate ice maker components or the cooling coil.
Step 5: Ensure EVERYTHING is COMPLETELY DRY
- This is critical. Any remaining moisture will refreeze and potentially restart the problem.
- Use fresh, dry towels and paper towels to dry all surfaces meticulously.
- It’s a good idea to open the refrigerator door and ice maker compartment for an hour or two to allow them to air dry completely. You can even direct a fan (on a cool setting) towards the area.
Step 6: Reassemble
- If you removed any covers from the ice maker, carefully reinstall them.
- Place the clean and dry ice bucket back into its position.
Step 7: Power Up and Monitor
- Plug the refrigerator back into the power outlet.
- Turn the ice maker function back ON via the control panel.
- It will take several hours for the refrigerator and ice maker compartment to reach operational temperatures and produce ice. Be patient.
- Monitor the ice maker over the next few days.
Important Tips for Manual Defrosting:
- Protect from Water: Use towels diligently to prevent water from running into other parts of your refrigerator or onto your floor.
- Time Commitment: This process can be time-consuming, especially if the ice buildup is severe. Don’t rush it.
- Symptom Management: Remember, this process cleans up the existing mess. If you don’t address the underlying cause (e.g., sealing gaps, a faulty component), the ice maker will likely freeze up again.
Conclusion:
A thorough manual defrost effectively clears severe ice buildup from your Samsung French Door refrigerator’s ice maker, allowing it to function temporarily or preparing it for a more permanent fix. It requires patience and care, but it can make a big difference.
Our next article, Method 4, explores an official remedy for some models: installing Y-Clips or other Samsung service kit components.