
Introduction:
This is Method 10 in our in-depth series on resolving freezing problems with the ice maker in your Samsung French Door refrigerator. If you have diligently worked through all previous methods – including sealing air leaks (Method 1), ensuring proper defrost cycles (Methods 2, 4, 5, 7), checking the fill tube (Method 8), and inspecting the ice room fan (Method 9) – and your ice maker still consistently freezes up or fails to operate correctly due to internal icing, replacing the entire ice maker assembly is often the next logical and most comprehensive solution.
Sometimes, the freezing issue stems from an internal, hard-to-diagnose fault within the ice maker unit. This could be a faulty internal miniature defrost heater, a malfunctioning sensor integrated into the assembly, a cracked mold, or a worn-out mechanical component that causes water to misdirect or accumulate and freeze. Replacing the entire unit addresses all these potential internal points of failure simultaneously.
Disclaimer: This guide is for informational purposes. Replacing the ice maker assembly involves disconnecting wiring and handling components within the refrigerator. Always unplug your refrigerator from the power outlet and turn off the refrigerator’s water supply before attempting any disassembly or repair. Ensure you order the correct replacement ice maker assembly for your specific refrigerator model. If you are uncomfortable with these steps, please consult a qualified appliance repair technician. We are not liable for any damage or injury.
When to Consider Replacing the Entire Ice Maker Assembly:
- You have systematically tried all other relevant troubleshooting and repair methods for the freezing issue (Methods 1-9) without achieving lasting success.
- The ice maker is old, and multiple components could be failing or nearing the end of their service life.
- The ice maker unit itself has visible damage (e.g., cracked plastic mold, severely corroded components).
- You suspect an intermittent internal fault that is difficult to pinpoint (e.g., a sensor that only malfunctions occasionally, or an internal heater that doesn’t always work).
- A professional technician has diagnosed the issue as an internal failure of the ice maker unit.
Obtaining the Correct Replacement Ice Maker Assembly:
- Crucial Step: You must obtain the exact replacement ice maker assembly designed for your specific Samsung refrigerator model number, or you know the part number. Using an incompatible part will not work and could cause damage.
- Sources:
- Samsung Authorized Parts Distributors: Provide your full refrigerator model number.
- Get it from Amazon: Samsung fridge Ice Maker Assembly
Step-by-Step Guide to Replacing the Ice Maker Assembly:
Step 1: SAFETY FIRST – UNPLUG THE REFRIGERATOR & TURN OFF WATER SUPPLY!
- Disconnect your refrigerator from the electrical outlet.
- Turn off the water supply valve to the fridge.
Step 2: Prepare and Defrost (If Necessary)
- Remove the ice bucket.
- If the old ice maker is severely encased in ice, you must manually defrost the area thoroughly as detailed in Method 3 before removing it. The area needs to be ice-free.
Step 3: Remove the Old Ice Maker Assembly
- The steps for removing the ice maker assembly are generally covered in detail in the disassembly sections of Method 1. This typically involves:
- Removing the Wire Housing Cover: (Usually one Phillips screw).
- Disconnecting the Ice Maker Wiring Harness: (Depress locking clip and unplug).
- Removing the Ice Duct Tray (if separate from the ice maker): (Usually one Phillips screw, then pry/slide off).
- Releasing and Removing the Ice Maker Unit: (Depress top locking clip, pull forward, then down, being careful with the cooling coil if present and attached to the old unit, though for a complete assembly replacement, the new unit will have its coil if applicable).
- Note on Cooling Coil: Some Samsung ice makers have an integrated cooling coil directly attached to the bottom of the unit. If your replacement assembly includes this coil, you’ll remove the old unit with its coil. If your replacement is just the ice maker body and the coil is a separate part of the refrigerator’s ice room, you’d only detach the ice maker from that existing coil (this is less common for full assembly replacements targeting freezing). Most full replacement assemblies for these problematic Samsung units will include the integrated coil.
Step 4: Install the New Ice Maker Assembly
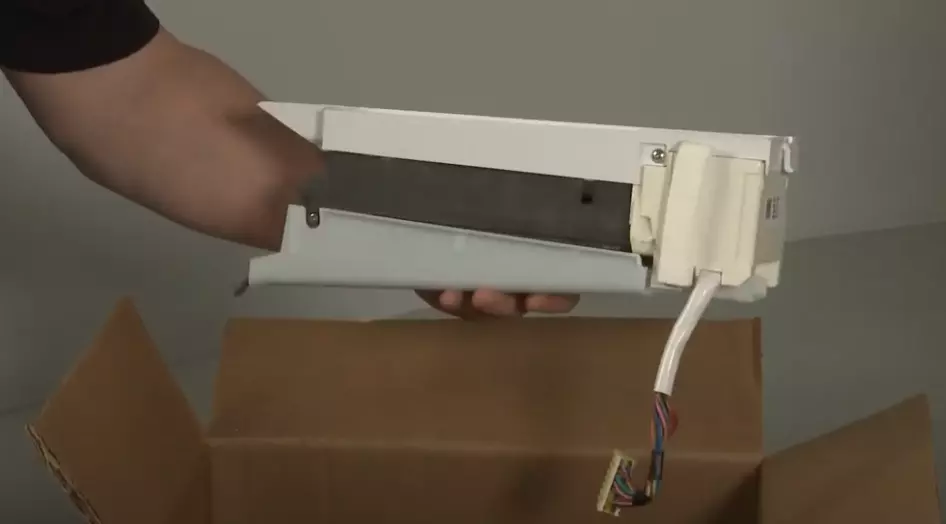
- Carefully unpack the new ice maker assembly. Compare it to the old one to ensure it’s the correct part and all mounting points look the same.
- Position the New Ice Maker:
- If it has an integrated cooling coil, carefully guide this into position.
- Align the new ice maker’s top mounting slots/tabs with the corresponding tabs/slots in the ice maker compartment.
- Push the ice maker towards the rear of the compartment until the top locking tab snaps securely into place. Ensure it’s fully seated.
- Reinstall the Ice Duct Tray (if it was a separate piece and not part of the new assembly): Push it up until it snaps into place and reinstall its screw.
- Reconnect the Ice Maker Wiring Harness: Plug securely until the locking clip engages.
- Tuck Wires and Reinstall Wire Housing Cover: Neatly arrange the wires in their respective side channels and reinstall the cover with its screw.
Step 5: Reassemble Other Components
- Install the ice bucket.
Step 6: Restore Water Supply and Power & Monitor
- Turn the water supply valve back ON. Check for any leaks at the refrigerator’s water line connection (though you haven’t disturbed this directly with this repair, it’s good practice).
- Plug the refrigerator back into the power outlet.
- Turn the ice maker function ON via the control panel.
- Initial Cycles: The new ice maker will take several hours to cool down, fill with water, and complete its first few ice-making cycles. Discard the first 1-2 batches of ice.
- Monitor performance over the next few days. A new assembly should resolve internal faults that were causing freezing.
Important Considerations:
- Root Cause Confirmation: While replacing the assembly is comprehensive, if the freezing was primarily due to external factors like severe air leaks into the compartment (which should have been addressed by Method 1) or main defrost drain issues (Method 5), even a new ice maker might eventually suffer if those conditions persist. This method is most effective when the fault lies within the old ice maker unit.
- Handling the New Unit: Carefully hold the new ice maker assembly, especially if it has an exposed cooling coil.
Conclusion:
Replacing the entire ice maker assembly is often the definitive solution when persistent freezing issues are traced back to the ice maker unit’s internal failure or wear and tear. By installing a new, fully functional assembly, you replace all its critical internal components, offering a fresh start for reliable ice production.