
Half-Windsor Tie knot
The Half-Windsor is a classic, versatile necktie knot slightly smaller and less bulky than the full Windsor. It’s an excellent choice for both formal and business casual occasions. Here’s how to tie it:
0. Start with the wide end of the tie in your right hand and the narrow end in your left. Ensure the wide end is about twice the length of the narrow one.
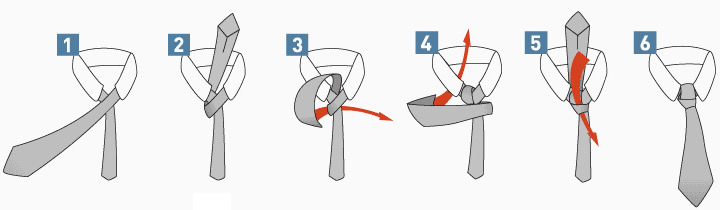
1. Cross the wide end over the narrow end, making an “X” with the ties.
2. Bring the wide end under the narrow end, from right to left.
3. Pull the wide end up through the loop you just created, but this time, loop it around the back of the narrow end first.
4. Tuck the wide end down behind the front of the tie, making sure it goes through the loop around your neck.
5. Tighten the knot by gently pulling the tie’s narrow end.
6. Adjust the knot so it sits evenly against your collar.